How to Disable or Delete Search History in Windows File Explorer
How to Disable or Delete Search History in Windows File Explorer
The search feature in Windows file explorer saves the searches of Windows File Explorer. Moreover, Search feature helps the users to search the same item next time. It saves the time to Search for a specific folder. It is no doubt a wonderful feature of Windows. If you don’t like this feature, you can Disable or Delete Search History in Windows File Explorer.
On the other hand, this feature has a genuine drawback. When you do share your computer with someone else like to Setup Different Wallpapers on Multiple Monitors etc. Someone else then can see your past History of File Explorer. So it is important to disable or delete search History in Windows File Explorer. There are many ways to turn off File Explorer Search History. Let’s discuss first, how to delete search History in Windows File Explorer:
To start with Delete Search History in Windows File Explorer, We first delete the specific terms you type in a search box. When you start typing, a list of suggestions will appear based on your Past searches. It will also appear the related searches in Windows. for example, you are searching for a Hiberfil.sys file in File Explorer.
To clear a specific search term from the search history in Windows 7, 8, or 10, start typing that search term in the Search box.

First,

Second, Once the a new key on the left panel has been created, now We will further move on:

Third, Double Click on the “DisableSearchbox” or Right Click on “DisableSearchbox”.

Close the Registry Editor either by selecting File > Exit or by clicking the “X” in the upper-right corner of the Window. Do not forget to restart you Computer.
On the other hand, this feature has a genuine drawback. When you do share your computer with someone else like to Setup Different Wallpapers on Multiple Monitors etc. Someone else then can see your past History of File Explorer. So it is important to disable or delete search History in Windows File Explorer. There are many ways to turn off File Explorer Search History. Let’s discuss first, how to delete search History in Windows File Explorer:
Delete Search History in Windows File Explorer
When you type anything in a Search box in Windows File Explorer. All the past History appear as a drop down Menu. All the suggestions help the users to search again for a specific folder in Windows File Explorer. It makes the searches easier and time-saving.
To start with Delete Search History in Windows File Explorer, We first delete the specific terms you type in a search box. When you start typing, a list of suggestions will appear based on your Past searches. It will also appear the related searches in Windows. for example, you are searching for a Hiberfil.sys file in File Explorer.
To clear a specific search term from the search history in Windows 7, 8, or 10, start typing that search term in the Search box.
- By Scrolling Down, Start Pressing “Delete” Button.

How to delete Complete File Explorer Search History at Once in Windows 8 and 10?
It is entirely easy to delete entire search History from File Explorer in Windows 8 and 10. On the other hand, Windows 7 has no any specific option Search in a Top bar. But Windows 8 and 10 have, let’s see how can we Delete Search History in Windows File Explorer.- Go to the File Explorer.
- Open the Search option From the Top bar.
- Click on Recent Searches.
- Enter to Save Changes.
How to Disable Search History in Windows File Explorer?
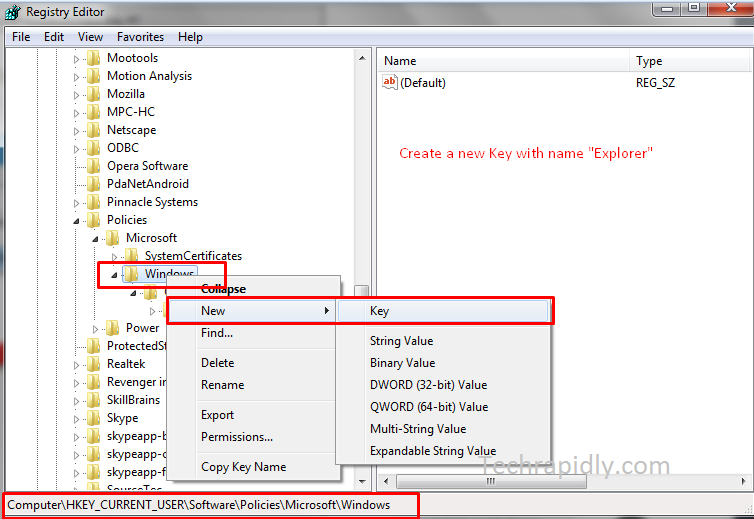
To disable Search History in Windows File Explorer, We would use Windows Registry. Make Sure, follow the steps carefully otherwise System can get damage using a single wrong keys in a Windows Registry. Windows Registry is used for many purposes likewise to enable or disable the Homegroup feature in Windows or you can Set up the Icon Size on a taskbar. Follow each step carefully:First,
- Go to Start > Open “Run” > Type “Regedit” > Open it.
- Or Press Windows Button + R to go for Run.
- Expland HKEY_CURRENT_USER > Software>Policies>Microsoft>Windows>Explorer
- Right-Click on Windows > New > Key.
- Make name “Explorer”.

Second, Once the a new key on the left panel has been created, now We will further move on:
- Right-Click on the right blank White space.
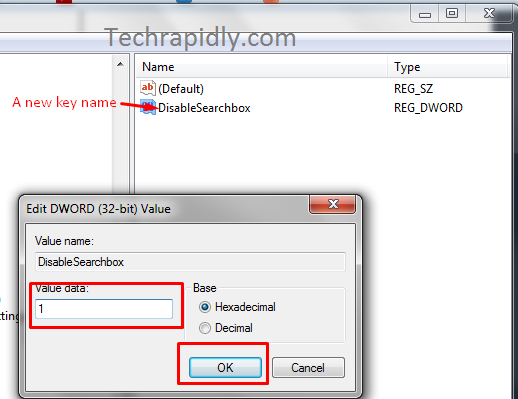
- Go to NEW > DWORD (32-bit) Value.
- Make a bew key with a name “DisableSearchbox“
- Press Enter to save changes.

Third, Double Click on the “DisableSearchbox” or Right Click on “DisableSearchbox”.
- Right Click on “DisableSearchbox”.
- Click on Modify > Enter Value data 1.
- By default, the value data was 0, Changed it to 1.
- Enter OK to save changes.

Close the Registry Editor either by selecting File > Exit or by clicking the “X” in the upper-right corner of the Window. Do not forget to restart you Computer.

No comments